Pages

Saturday, November 2, 2013

Desk turned Nightstand


Well, here it is. I'll show you the after before the before.

I am in the process of redoing our master bedroom. Last weekend I finally painted the walls a nice neutral greige, after being gold for more years than I wanted.  I just needed one thing to get the ball rolling, and I finally found a bedspread I loved, so it has begun.  

My best friend and personal decorating consultant stopped by last week and told me I needed a nightstand on my side of the bed that sort of matched the dresser on the other side

Here's what I was using, an antique sewing cabinet.

So I started checking craigslist for something cheap or free I could remodel to work. Then it struck me. I had a french style desk in the basement I bought a few years back to paint and resell.  I think I paid $30 for it. The wheels started turning, and I got to thinking maybe I could take the top off of it, cut it back and just use the drawer side as a nightstand.


Here's what I started with.

It's a cheap piece with lamitated particle board for most of it, and the top is like a formica.  I started by removing the top and right leg section.  Most of it just came apart pretty easy, and I was left with the drawer end and a couple of supports that just needed to be cut flush with the chest part. 


I cut the long pieces off, and was left with a nice 3 drawer chest.

The biggest hurdle was figuring out how to reuse the top, or make a new one.  I considered a couple options, and decided I could cut the old top in 2 pieces and screw them back together. That way I retained the cute, curvy shape that it was.  Luckily, my hubby came home just about the time I had decided that was the plan. He hauled out Grandpa's old (seriously antique, I think!) table saw, and made the cuts I needed. I went back downstairs and fastened the pieces together. 


It's what I was thinking, but the rough, laminate joint in the middle's not going to cut it!

So, off to Lowe's I went to try find a thin piece of plywood to cut to lay over this. I found a 2'x2' piece of birch plywood for $4.58, and new jigsaw blades for $3.08.  A little over $8.00 with tax, and I'm a happy girl!  Back home to my basement 'shop' and I traced the shape of the top on my plywood. Cut it out with a jigsaw with a new blade, so worth the money, and it came out great.


A little sanding and adjusting, and it was perfect.

Fortunately again my hubby came home just then. We tried to think of ways to attach it, as it is too thin to nail or screw. I was going to buy a tube of Liquid Nails, but decided he would surely have something that would work.  Ah, we have an old can of contact cement from redoing my parents countertops years ago. He had to pretty much destroy the lid to get it open, but once inside, it was fine. You brush or roll a coat on each surface, and let it dry for like 20 minutes. It gets tacky, and then you stick in on. We did that, and put heavy stuff on it to dry overnight.

Then I got to paint it, my favorite part. Nothing transforms things as quickly and easily as paint.  Even though it was basically the color I wanted, I didn't want that fake yellow greenish laminate wood look.  A couple of coats of Annie Sloan chalk paint in Old White, and I am in love. 


The paint is kind of pricey, but I love how it turns out. When you sand it, it comes off really chalky, but the surface is so smooth.  It's pretty distressed too, but hard to tell from these pics.  The dresser that it is supposed to match was a craiglist freebie that might be my most favorite. It has been in my daughter's room, but she rearranged and didn't want it anymore. Yea for me, now it's mine!! I'll share that with you another time.  


The top worked out so well, no one would ever know. Except now I just told everyone. 

I'm so happy with this piece. It is exactly what I was picturing in my head.  A small chest with lots of storage, and solid to the floor to hid all my cords behind it.  It usually holds a lamp, electric blanket control, kindle and charger, etc.  


One more, just for fun.

I have one more chest to redo for our bedroom, and hopefully a chair. I was going to reupholster the gold chair, but decided it has a lot of vintage appeal.  I'm going to leave it as it for now, just find it a new spot.  My daughter used it for senior pics, but I haven't got to see them yet. Can't wait!!

Thanks for taking the time to stop by and share my fun. Hope I inspire someone to try their own projects!

Karilyn


Thursday, October 10, 2013

Mid-Century Modern Dresser

This weeks project, or really last weeks, but I just haven't gotten around to posting it, is a dresser that has gone through a few changes.  It was a bargain corner(pre-craigslist) purchase before my second child was born.  I needed another dresser, and this was what I found.  I am sorry I don't have any before or in between pictures, just after.  

It started out white with simple tapered legs. I put small turned legs on it and put a fresh coat of paint on it.  Then when we moved from little boy to big boy I painted it blue and put a larger turned bun foot on it.  It's been that way for a long time. 

This summer my son decided he wanted a corner desk, and as good fortune would have it, that day there was a free one on craigslist that came with a chest. It is actually really heavy duty office furniture with a lateral file.  The desk went in the corner, and we took the dividers out of the file piece and put it in his closet for a dresser. Fits perfect!!  Someday I'll do a post on his room.

Anyway, the blue dresser came out and has been sitting in my dining room for a couple months. I thought it might get used elsewhere, but have decided to part with it. So...touched up the paint, changed the knobs and again changed the feet out for ones more fitting the style.  I really love how it turned out! Too bad I don't have a use for it.  

Here it is, it's on it's way to craigslist. 


I'm not the best photographer, and the lighting in my house is horrible.  If I would have dragged it outdoors and taken pictures in natural light the colors would have turned out way better. But, I don't have any helpers around, so this is what I get.  


The paint chip and the little sample on the lid look really navy, but in real life it turned out more of a grayish blue, which I'm really loving now.  I left the knobs and feet natural, and I think the contrast is cool.


The drawers are lined with a blue plaid wallpaper, and the door on the right had a slide out rack for hanging small clothes. It was a baby dresser to begin with.  


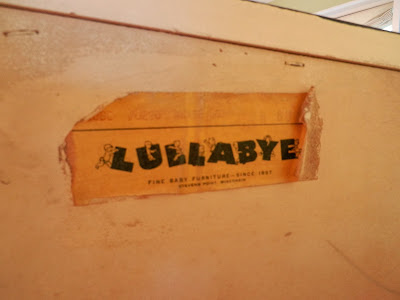
Here's the tag on the back to prove it.  It says, "Fine Baby Furniture Since 1897."


Here's one more picture with horrible glare from the window.  

Kinda wishing I had a baby boy to go with this, but he's a freshman this year. My baby days are behind me. 

If any of my local friend are interested, let me know. I'd be happy to see it in a new home.

Thanks for stopping by, have a great day!

Karilyn


Friday, September 27, 2013

Kitchen Pendant Lights

Hi again everyone! It's been quite awhile since I've blogged about anything.  Life seems to have taken over, but fall is here and I am determined to be more consistent with my life. I have a senior this year, which means open house come spring.  After helping a friend get ready for one this last spring, I decided to start early with my house projects so as not to be trying to do 100 things at the last minute.  I'm sure I'll still be doing 100 things come spring, but at least maybe I'll have 20 or so behind me.

I have a list of ideas/projects that seems to keep growing. One thing leads to another...(I hear a song in my head!) and I keep seeing more things I'd like to do.  So, I am going to try to stick at it and do at least one item a week. It's so fun to check something off the list.

This week I painted my kitchen lights, and put new shades on them.  I bought one shade about a year ago at Lowe's, but never did anything with it.  I picked up two more this week and went to town.

Here's the before picture.


I have 4 pendant lights and a ceiling fixture. The one on the left is the original shade. The three others are shades I found at a tag sale and the paint on the inside is slowly peeling off, dropping on the counter. The ceiling light has a ribbed shade, and the mottled brown color didn't match the others, and none of them looked good. Like they were going for antique bronze, but missed.

So I took them all down and figured out how to use the new drum shade I bought.


Then I spray painted them all satin black, then a light coat of oil rubbed bronze.  I love me some spray paint! In the midst of it I decided my green clock needed to be black, so it got a new coat too.


Here they are.  The pictures don't really do justice to the change, but trust me, it's a great improvement. They are all the same color, and I'm lovin' the new shades! The lights on picture was last night, the brighter one was this morning, the colors are much better. Notice also I decluttered the frig a bit for the pic.  


Don't love this light, but it will do for now.


I forgot to take a picture of the before clock, but here it is. Like my new black accents!

Well that's it for this week. I also refinished a table, but I'll show you that another day.

Thanks for stopping by.....


Wednesday, April 10, 2013

Pinteresting T-shirt Drawers

It's really rainy and gloomy here in Michigan, especially after Spring Break in the warm, sunny south. I feel like I have been doing laundry for 2 days straight to get caught up! Unfortunately, all the shorts, tanks and T-shirts need to be left in the drawers until spring arrives here. As I was trying to stuff my kids clothes back into their drawers, I remembered a pin for storing T's in a drawer. I apparently hadn't pinned it, but a quick search showed a few options. The idea is to fold your T's in a way that you can stack them front to back, with the logo showing. I'll just share my pictures, that are pretty self explanatory.


Before of the top drawer with tanks and camis.


After with the tanks and camis on the right. I left a couple stacks of plain short and long sleeve tops that didn't fold well to fit the new system. That's OK, they are nicer and I don't want them too wrinkled.


T-shirt drawer before. I swear, every event in a teens social life involves another new T-shirt. Someday when she's done wearing them, I will make her T-shirt quilt. BTW, this is pretty much what it looks like every morning after she leaves for school. Both drawers open, with everything all messed up from trying to get a shirt from the bottom of the pile!


T-shirt drawer after!  I had to switch a couple of things around, because the drawer the T's were in was too shallow for the folded shirts. This is so awesome! You can see each shirt, pick the one you want and not create a major upheaval of all the others. Crossing my fingers that it works.


Here's the jeans in the former T-shirt drawer. I love order!!


I was having so much fun, I decided to do my son's drawer too.


Everything fits with room to spare. I had to swap his drawer too, for the next drawer down, so it was deep enough. He doesn't make a mess of his clothes, but I have to rotate his shirts, or he'll just pick the top one everyday. This way he can choose whatever he wants. 

Well, it's time to think about making dinner, so my fun is done. Maybe I'll try another idea tomorrow! 

Thanks for stopping by.


Monday, March 18, 2013

Cargo Pants Messenger Bag via Pinterest

I finally finished what I thought would be a quick project.  I started it a week ago Saturday, ran out of matching thread, and it sat there until today.  Quite awhile ago I pinned a tutorial to make a messenger bag out of a pair of cargo pants. Lucky for me, my son had a pair of army greenish ones that he said were ugly, and would never wear again. I'm pretty sure they were his choice a year ago, but his loss is my gain. Saved myself a trip to the thrift store, and a couple of bucks.


I think it turned out awesome!  Here is the link to the original post. noodle-head cargo pant messenger bag
I have used her patterns before, and really like them. I won't bother with a tutorial, you can just follow hers. It was pretty easy, and made from stuff I had on hand. The only thing I changed, was I made the strap adjustable with buttons.


I wasn't sure if I would want it as a shoulder bag, or a cross body messenger bag. This way, I can use it either way. I used a rectangular ring from an old strap in my stash. Not much gets thrown away around here, never know when you'll have a use for something. It's a bit of a curse, but usually works out for us!


You cut the front flap piece from one of the sides of the pant with the cargo pocket on it. My pair had these pockets on one side, and one larger pocket on the other. Not sure if these pockets are super useful, but they look cool, so I chose this side. My cell phone will fit in the bottom one.


I lined the bag and the strap with this fun print in a reddish coral print. I really like this color, and have a jacket in it that will look great together. I chose another floral print with a lot of colors to bind the flap and make inside pockets. Hoping spring will hurry up.  :) 


Put one of my labels on the outside pocket, I just like how it looks.


So there it is, my new bag. Another pinterest idea finished successfully. Yea!! Pretty sure I'll never get around to trying all of them, but it's still fun to have lots of ideas to choose from. 

Keep pinning!


Saturday, March 2, 2013

Two Dollar Chair


Well, here it is.

 We were heading out to dinner one evening, and happened on an almost over garage sale. My husband and I jumped out, (against our children's wishes), and took a look. We saw this chair, and  I think it was marked down from $10 to $5. My husband and I looked at it, and the woman came up to us and said we could have it for $2. SOLD! Now, it looked pretty rough, but we could see it's potential.

The fabric was, as you can see, really worn out, and the arms were beyond filthy. I ripped the trim and nails from around the arms, to get rid of some of the yuck. 

Then I draped a blanket over it and there it sat, just like that for well over a year. Funny how after awhile you just get used to something, even if you don't like it. I couldn't decide on a fabric or color to recover it, so, it waited.

Then, when I put the chevron fabric on my wing back chair, I was inspired to finally do something with this chair. So, we un-upholstered it. It is the not fun part of upholstery, but not only to you get the yucky fabric off, you get patterns for your new pieces. 


You start at the bottom, taking it off piece by piece, and take a lot of pictures and remember the order that they came off. They will go back on in reverse order. This chair had 2 layers of cotton and horse hair on the seat, which I replaced with foam and dacron batting. It also had a major spring issue too, which required retying and new metal straps. Lucky I have an amazingly handy hubby, who loves to do that part for me.
This is what the bottom looked like after we took the black fabric cover off.
This is what it looked like after we took the straps and burlap off. It needed some major work. It was kind of wobbly too, and after removing the fabric and batting, we found the frame had a crack along the top. Again my hubby glued and screwed all the joints to make it sturdy again. 
After all that, we were ready to start putting it back together. I had found a fabric at Hobby Lobby that I liked, but it was a little pricey. That's probably why it sat for so long. But, with the 40% coupon, I decided it was my choice. I laid out all my removed pieces, figured yardage and went and bought fabric, gimp, foam, batting, staples and nail head trim. After I got the fabric home and started upholstering, I really fell in love with it. It's the coolest piece I have ever done.

It makes me happy every time I look at it!

The design on the fabric is shiny silver metallic. If you look in the cabinet to the right of the chair, the candlesticks are mercury glass I found at a garage sale last year. Perfect!


After
Before

It had great lines and the wood was in great shape, so it was worth the effort. I first just had gimp glued over the staples, but the nail trim really made it. 


One more shot of my new favorite!


Saturday, February 23, 2013

Kindle Keeper

My family gave me a Kindle Fire for Christmas this year, and today I decided it needed a case. I googled DIY  kindle case and got a few ideas. After looking around I decided I wanted one very similar to another item I make, a junior portfolio.  I'll admit, it's not my finest work, but it will protect and carry my kindle in style for now. I learned what to do and not to do next time.


I wanted an inside pocket to hold it snugly, and a frame holder to hold it and be able to use the touch screen.


The carrier pocket is on the left, the screen holder on the right.  I had some wide elastic that worked great!


The cover is held shut by velcro, and can be folded to the back and the velcro holds it there. Bonus!!


I had to make a separate piece to attach the elastic to, and I should have made it a bit smaller. My seam allowances on the top and bottom got a little small, but I made it work. If you look carefully at the pictures, you'll notice the velcro is in a different spot. I had to move it over to make it close. It ended up thicker than I planned for, and the velcro wouldn't reach. I made note of my errors, and will do better next time. In the mean time, I'm really happy with this one. When the laptops are being used for homework in the evenings, I can still browse pinterest.

The fabrics are from Hobby Lobby, and I love them!